06 June 1915
HELLES - THIRD BATTLE OF KRITHIA - It is often forgotten that Australian artillery units were present during the fighting at Helles. Gunner Ralph Doughty of the 2nd Battery, 1st Artillery Brigade was amongst those who played a vital part in stemming the onslaught of rampaging Turks during their counter-attacks on 6 June.
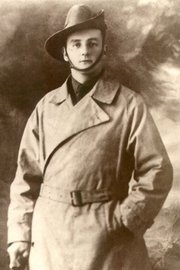
"Very rowdy morning. Got action before breakfast and kept a warm fire for an hour. Immediately afterwards got to it hot and strong. Our gun was detailed to keep reinforcements from getting to the firing line, via a small nullah. And it did. We just waited for them to come over the far crest and they got it. We had them on toast alright. Couldn't advance or retreat and our guns cut off flanking movements by spraying each side with shrapnel. The only thing for them to do was to take cover in a bit of light scrub which they did and we got on to that scrub and searched every inch of it for two solid hours. I've just been to the observation station and had a look at it with the glasses. Not a man came out of it alive. The ground is packed thickly with them. I am as deaf as a mule in the right ear and both hands burnt a bit. We're having another go in a few minutes." (Gunner Ralph Doughty, 2nd Battery, 1st Field Artillery Brigade, AIF).
HELLES - THIRD BATTLE OF KRITHIA - As the Turkish reserves arrived in the days following 4 June there was some desperate fighting. The Turkish counter-attacks were pushed with such vigour that at times threatened a real breakthrough themselves as there were few Allied reserves at hand to plug gaps in the line.
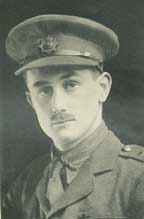 The desperation can be judged by the award of the VC to the 18-year old Second Lieutenant Dallas Moor who despite his youth was acting as commanding officer of the 2nd Hampshires when on the morning of 6 June there was a dangerous outbreak of panic in the salient left by the partial retirement of the 42nd Division. Terrified of being cut off, the troops occupying the front line trench (known as H12) went running back promoting equal chaos in the second line (H11) whose garrison also fell back in terror. This was becoming serious as the Turks were threatening a complete breakthrough. Moor rushed across and stemmed the retreat by the abrupt action of shooting up to four of the fleeing soldiers. He then managed not only to stop the rout, but to rally them and lead them forward to retake H11 although still leaving H12 in Turkish hands. This level of chaos and panic was not an isolated incident as the Turks pushed down the gullies, seeking to penetrate as far as they could out of sight as they probed at the weak points in the line.
His citation for the Victoria Cross reads:
"For most conspicuous bravery and resource on the 5th June 1915 [sic], during operations south of Krithia, Dardanelles. When a detachment of a battalion on his left, which had lost all its officers, was rapidly retiring before a heavy Turkish attack, Second Lieutenant Moor, immediately grasping the danger to the remainder of the line, dashed back some 200 yards, stemmed the retirement, led back the men and recaptured the lost trench. This young officer, who only joined the Army in October 1914, by his personal bravery and presence of mind, saved a dangerous situation."
Whatever one thinks of Moor's precipitate actions on 6 June 1915, Moor was to prove himself a brave officer who was subsequently awarded the MC and Bar for services on the Western Front. He died from influenza on 3 November 1918 and is buried in the Y Farm Military Cemetery, Bois-Grenier
"SOURCE:
R. D. Doughty, Diary 6/6/1915. There is a wonderful web resource on Ralph Doughty which you can find here: http://www.thekivellfamily.co.nz/family_pages/ralphs_diaries/Ralph_Doughty.html This is really worth reading. Thanks to Peter Kivell