The Landings
A great fleet of warships, troop transports and freighters had now been assembled in the Aegean and eastern Mediterranean to carry the landing force to its various beaches. Time was short and there was little to spare for practice in watermanship for the infantry. Final embarkation took place on the Greek islands made available by Prime Minister Venizelos and as night fell on 24 April the fleet closed in on the Gallipoli peninsula as the Royal Naval Division’s diversionary force, charged with conducting a pretence landing operation, ostentatiously entered the Gulf of Saros where, after dark, an officer, Lt Commander Freyberg, swam ashore pushing a raft of flares which he ignited to cause a diversion and convince Liman von Sanders that the main allied landings were to take place in that area; the deception operation continued after daybreak on the 25th when elaborate demonstrations of boat-lowering and a light bombardment failed to draw any reaction from the enemy ashore.
In the hours before dawn part of the fleet, carrying the Anzac troops of the covering force charged with securing a beachhead from which the main body would debouch onto the Maidos Plain, and establishing themselves firmly on the Sari Bair ridge, approached the coast in total silence. The transfer to the tows of boats carrying the first wave ashore was also made in a highly disciplined silence. All seemed well, until the string of boats veered northwards to avoid the defences at Gaba Tepe. Instead of landing south of the Ari Burnu headland where a gently sloping sandy beach awaited them, they were deposited north of the headland to be confronted, as dawn broke to reveal their predicament, by a virtual cliff rising from a beach only a few yards wide. With the first glimmer of dawn the defence saw that a large fleet was close inshore and disembarking troops. The alarm was sounded and rifle and shrapnel fire began to be directed towards the Anzacs. The garrison at Gaba Tepe, a mile to the south, stood to arms as the Anzacs threw down their packs on the beach and charged up the steep slopes facing them. The vigour of this advance was astounding but as it developed, units became hopelessly intermixed, troops lost contact with their officers and each other, and chaos set in.
 Photograph: Mustafa Kemal
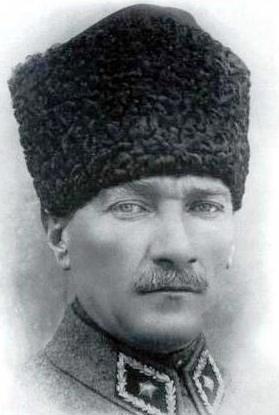
On the Turkish side, the defence was in the hands of the 19th Division, commanded by Mustafa Kemal. Without reference to his superiors he rode at once to the summit of Chunuk Bair from where he could see the situation at a glance. He immediately launched one of his three regiments, the 57th, which was deployed close at hand to charge the oncoming Anzacs who had almost gained the summit but were blown and hopelessly intermixed . His orders to the 57th regiment were nothing if not direct: 'I am ordering you not to attack but to die' - which they duly did, saving the situation and buying time for further reinforcements to join the counter attack. The Anzacs were hurled back off the summit but held on sufficiently to establish a precarious front line which endured until the end of the campaign. This is where the Anzac legend was born, in places like Quinn's Post, 'Johnson's Jolly', 'Courtney's', and The Nek.
Whilst the Anzacs were battling their way up the Sari Bair ridge the landings at Helles were under way. Beaches selected had been named as 'X', 'Y', 'V', 'W' and 'S'. Whilst 'S' and 'Y' on the right and left flanks respectively were only lightly garrisoned and quickly taken, lack of initiative and the failure of the 29th Division's commander Major General Hunter-Weston to exploit success resulted in tactical stagnation. At 'V' and 'W' beaches the picture was very different. Each was held by little more than a platoon of Turkish infantry but they exacted a terrible toll on the attackers. At 'W' the Lancashire Fusiliers were able to fight their way off the heavily wired beach, gaining six VCs in the process, but at 'V', where the Royal Dublin Fusiliers in ships' boats and the Munsters and Hampshires aboard the River Clyde were to land, there was slaughter; a naval pilot flying overhead thirty minutes into the assault was horrified to see that the sea was red with blood up to fifty yards from the shore. For the rest of that day the attacking troops were pinned down on the shoreline, unable to move.
For Hamilton, cruising offshore aboard the Queen Elizabeth it was a day of frustration. The command of the Helles operation was in the hands of Hunter-Weston who had become focussed, it seems to the exclusion of all else, to the fortunes of his troops at 'W' and 'V' beaches despite messages from 'Y' and 'S' beaches that opposition was either non-existent of had been easily overcome. At 'X' beach the landing of the Royal Fusiliers had been supported by the pre-dreadnought battleship Implacable whose captain brought her within a few hundred yards of the shore to engage the small Turkish garrison point-blank with his 12-inch guns, with which he continued to deal with incipient Turkish counter attacks. Even so, Hunter-Weston's intention of linking the beach-heads at 'X', 'W' and 'V' beaches by last light to permit the rest of 29 Division ashore and on to Krithia and Achi Baba was conclusively and bloodily foiled by mid-day. Hamilton, who could see clearly what was going wrong, was dissuaded from interfering by Braithwaite his chief of staff, an admirer of the great Helmuth von Moltke, creator of the Prussian General Staff, whose creed was that the commander-in-chief, having once issued his operational instructions, must stand back and leave the planning to his staff and the execution thereof to the field commander, who in this case was Hunter-Weston. Hamilton therefore did no more than offer a string of suggestions to Hunter-Weston, none of which was heeded.
Night fell on scenes of despair and confusion at Helles and Anzac, where Birdwood had been summoned ashore by his senior officers for what amounted to a council of war. The narrow beach at Ari Burnu - ever thereafter immortalised as Anzac Cove, was choked with personnel and equipment as streams of casualties were carried back off the slopes above. . The spectacular charge up onto the heights of Sari Bair earlier in the day had so nearly taken the Anzacs to the vital summits; but Mustafa Kemal's rapid appreciation and firm direction of the defence had frustrated the attackers. Men were pouring back to the beach in search of their units and officers, discarded packs, food, water and ammunition. Major General Bridges, commanding the 1st Australian Division, favoured immediate re-embarkation as did several others, and a signal to that effect was sent to Hamilton on board the Queen Elizabeth. Woken at midnight with this unwelcome news he sought the advice of the naval commander who told him that it could take three days to get the troops off Anzac and would invite disaster. Hamilton therefore signalled Birdwood to dig in.
During the night of 25-26 April the attackers were faced with almost unimaginable scenes of confusion and apparent disaster. At Anzac, where rain had set in, the beach was filling up with hundreds of wounded, brought down from the summits, and stragglers seeking to regain their original units. Stores of every type were piling up on the narrow strip of beach, and Turkish artillery was now bringing down accurate shrapnel fire to inflict further casualties on the beach parties and incoming boats. Despite this, however, the engineers were accomplishing wonders; within 48 hours their bore-holes just above the beach were producing tens of thousands of gallons of drinkable water and condensers were being brought ashore to augment the supply. On the ridge barely a thousand yards above the beach the infantry were digging frantically to establish some sort of front line against mounting Turkish counter attacks. Innumerable deeds of heroism took place, notably involving the evacuation of wounded to the beach; within days one medical orderly in particular had secured his place in Australian mythology:Private John Simpson Kirkpatrick, serving as Simpson, commandeered a donkey with which he conveyed wounded men down to the beach until killed himself. Turkish snipers demonstrated their skill and courage for several weeks until finally cleared out of the beachhead; their principal victim was General Bridges, mortally wounded on 15 May.
The first great crisis at Anzac came on the night of 2 May when the Turks charged in mass formation against the precariously held Anzac posts on the ridge above the beach. The attack was repelled with enormous loss to the attackers. Some four thousand Turkish dead were left in the open in front of the Anzac front line and so dreadful was the mounting stench that an armistice was arranged during which both sides emerged from their trances to bury the dead. Until August, when the next great offensive was mounted in an effort to break the deadlock, the Anzac line held on, its garrison in places less than twenty yards from their opponents, with whom a curious relationship developed, born of mutual respect. Nearly a century later this persists.
At Helles, as night fell on 25 April, it was possible to succour the surviving wounded on the shoreline and the troops who had been cooped up aboard the River Clyde were able to get ashore, to be greeted by the appalling sight of the Dublins and Munsters lying dead on the sand and in the shallows. On the morning of the 26th, Colonel Doughty-Wylie, one of Hamilton's staff officers, led an ad hoc body of troops up into Sedd el Bahr village, clearing it of numerous snipers, dying himself at the moment of victory at the top of the hill overlooking the bloodied beach. There followed two days of consolidation as the battle-shocked units sorted themselves out. The remnants of the Dublins, who had lost over five hundred officers and men, amalgamated with those of the Munsters to form a scratch battalion, the 'Dubsters', for the next phase of the battle. This was to be the capture of Krithia village, optimistically chosen as the first day's objective. What became known as the 'First Battle of Krithia' was predictably a hopeless failure; the troops were still mostly in a state of shock, poorly briefed and unrehearsed. The subsequent two battles for Krithia, lasting well into the high summer, were equal failures. One of the great tragedies of the campaign occurred during the 3rd battle on 4 June when the newly arrived and inexperienced Collingwood Battalion of the Royal Naval Division was destroyed within an hour of going into battle for the first time. Reinforcements were arriving, led by the 42nd East Lancashire Division from Egypt and then the 52nd Lowland Division from the United Kingdom. Both were Territorial units; the Lancashire Division was in superb condition following its robust training in Egypt but the Lowlanders, employed hitherto in guarding ammunition dumps along the Firth of Forth, arrived on the peninsula unprepared for what awaited them. They were pitched piecemeal into battle and suffered grievously. (They had already lost half a battalion of the Royal Scots in the Gretna Green rail disaster) .
By mid-June it was apparent that stalemate, comparable to that on the western front, had set in at Gallipoli. In London, Fisher and Churchill had finally fallen out and the old admiral had resigned despite a note from the Prime Minister ordering him back to his post '…in the King's name'. Churchill's days at the Admiralty were then numbered. Hamilton's pleas for more reinforcements were met by the offer of an additional army corps, with which he could execute the plan drawn up by his staffs: a landing in Suvla Bay to the north of Anzac to coincide with a grand assault on the Sari Bair ridge and a diversionary attack at Helles. The commander of the new corps - the IXth - was to be Lieutenant General Sir Frederick Stopford. As with many of the other generals involved in the subsequent operation he had been brought out of retirement. He was placed in command of no less than five infantry divisions, two of which were Territorials (the 53rd Welsh and 54th East Anglian) and the rest from Kitchener's 'New Armies'. The territorial divisions had already been milked of their more experienced personnel as reinforcements for the western front and many units were well below their full war establishment. The Kitchener troops in the 10th (Irish), 11th (Northern) and 13th(Western) divisions were typical of the new Armies: patriotic, enthusiastic, partly trained for trench war on the western front but totally unprepared for the open warfare and climatic conditions awaiting them at Suvla, and led by officers at all levels who did their best but whose experience was wholly without relevance to the task in hand. It is worth noting that the battalions of the 10th (Irish) Division had to made up to war establishment by large drafts of surplus recruits from (mainly) Yorkshire and Lancashire as recruitment in southern Ireland was not as satisfactory as it was in England due to a number of factors, among them population size, the growth of Irish nationalism in the years prior to the outbreak of war, and the suspension of the Home Rule Act in September 1914.